- Log messages output by user applications and OS can be received and displayed on a PC.
- When a program running on the terminal is in a state of waiting for input while calling the Idle function, the log messages are transferred from the terminal to LogReceiver.
- Please note that log messages will not be forwarded until the above waiting state is reached.
- You can receive the captured image of the device screen, display it on the PC screen, and save it in a file.
Important:
- This utility supports Windows 10 (32bit, 64bit). Other OS is not supported.
- To use this utility, .NET Framework 4.5 or later must be installed.
- Depending on the performance and configuration of your PC, a communication error may occur. In such a case, try another PC.
Install LogReceiver
- If you already have the LogReceiver utility installed, open Programs > Programs and Features in Control Panel and uninstall "LogReceiverOPH".
Note:
If you install without uninstalling, the following warning will be displayed during the installation and you will not be able to continue the installation.
"Another version of this product is already installed. Inatallation of this version cannot continue..."
- Download the zip file from the following link.
- Unzip the downloaded zip file and you will get the following file:
SetupLogReceiverOPH.msi
setup.exe - Open setup.exe file to launch the installer.
- Follow the guidance of the installer to install. All the setting items displayed during installation can be left at their defaults.
- When the installation is completed normally, the shortcut will be registered in the [Opticon] folder of the Start menu with the name "LogReceiverOPH" by default.
You must also install the USB driver to use LogReceiver.
Device settings
In order to connect the LogReceiver installed on the PC to the device, make the following settings on the device side.To receive log messages from the device with the Log Receiver installed on the PC, open Log settings on the device side and make the following settings.
- Enable Enable transfer.
- If you want to receive the log messages of the application program, open Debug zone in Log settings and enable ZONE_APP.
Operation of LogReceiver
When you start LogReceiver, the following screen is displayed. Click the close button on the title bar to exit LogReceiver.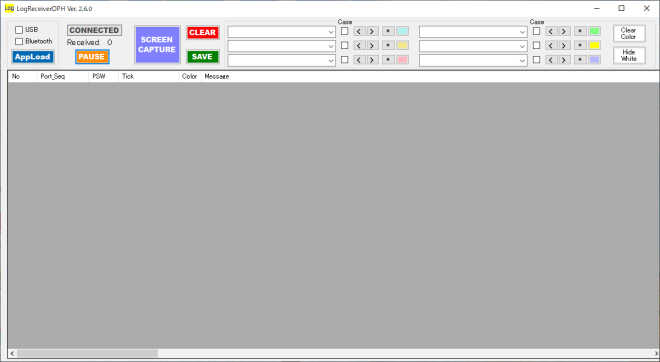
 |
Enable ports to receive log messages.
Caution:
|
|
When the device is connected, CONNECTED is displayed in blue letters. When not connected, it is displayed in gray. |
|
|
Disable USB and launch Appload utility. |
|
|
Temporarily stops adding received log messages to the list display. Log messages continue to be received while you stop adding to the list. |
|
|
Clears the log messages displayed in the list. |
|
|
Save the log messages displayed in the list to a file. |
|
|
Enter the search string in the combo box. Click [<] to search backwards and [>] to search forwards. Check the check box to distinguish between uppercase and lowercase letters. Click [*] to perform a full search and change the color of the line containing the search string to the color of the [Color Button]. Click the [Color Button] to change the color settings. |
|
|
Hide white lines and display a list of colored lines only. |
|
|
Display a list of all lines. |
|
|
Make all lines white. |
|
 |
Opens windows that display a screen capture image of the currently connected device.Screen capture image window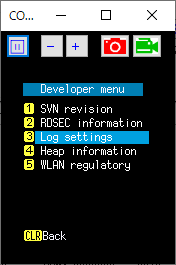 Operation:
Note:
|
Double-clicking on a line in the list display opens the "Edit Message" window where you can edit the log message and change the color.

List display
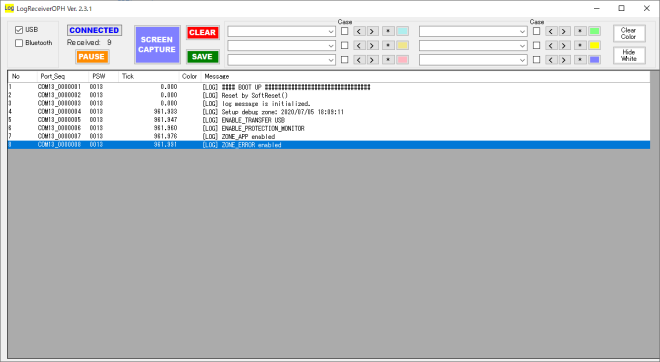
The contents displayed in each column of the list display are as follows.
| No | Line number |
| Port_Seq | Port name and sequential number of the message |
| PSW | PSW register of the CPU |
| Tick | A value in milliseconds that represents the value of the Tick counter of the OS. Three digits after the decimal point represent microseconds. |
| Color | Color information set in search etc. |
| Message | Log message output by the program |
See also:
Last updated: 2024/05/09