- You can connect OPH-5000i to a PC via USB, receive the captured image of the terminal screen, and display it on the PC.
- You can also save the captured image to a file on your PC.
Important:
- This utility supports Windows 10 (32bit, 64bit). Other OS is not supported.
- To use this utility, .NET Framework 4.5 or later must be installed.
- Depending on the performance and configuration of your PC, a communication error may occur. In such a case, try another PC.
Install RemoteScreen
- If you already have the RemoteScreen utility installed, open Programs > Programs and Features in Control Panel and uninstall "RemoteScreenOPH".
Note:
If you install without uninstalling, the following warning will be displayed during the installation and you will not be able to continue the installation.
"Another version of this product is already installed. Inatallation of this version cannot continue..."
- Download the zip file from the following link.
- Unzip the downloaded zip file and you will get the following file:
SetupRemoteScreenOPH.msi
setup.exe - Open setup.exe file to launch the installer.
- Follow the guidance of the installer to install. All the setting items displayed during installation can be left at their defaults.
- When the installation is completed normally, the shortcut will be registered in the [Opticon] folder of the Start menu with the name "RemoteScreenOPH" by default.
You must also install the USB driver to use RemoteScreen.
Operation of RemoteScreen
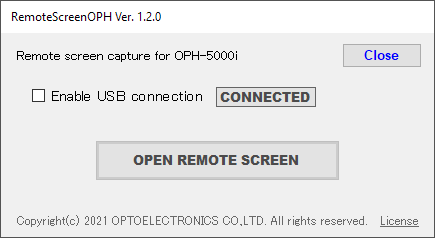
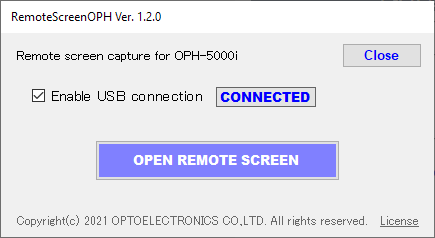
- Open "Opticon" in the start menu and click "RemoteScreenOPH" to start the RemoteScreen utility. It can also be started from the shortcut of "RemoteScreenOPH" placed on the desktop.
-
Connect OPH-5000i to the PC with a USB cable, and enable the [Enable USB connection] check box to start the connection automatically. When the connection is completed, [CONNECTED] is displayed in blue letters.
-
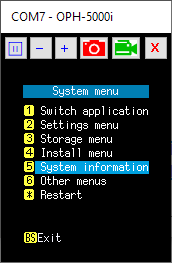
Click the [OPEN REMOTE SCREEN] button to open the capture screen as shown below, and the image displayed on the OPH-5000i screen will be displayed. If multiple devices are connected, the capture screen will open as many as the number of connected devices.
Operation:
- [⏸] button:
- The update of the captured image is paused, and the button changes to [⏵].
Click [⏵] to resume the update, and the button will return to [⏸]. - [-] button:
- Reduces the display size of the image.
- [+] button:
- Increase the display size of the image.
 button:
- Save the current image. Saved images are stored in the [RemoteScreenOPH] subfolder in the Windows [Pictures] folder.
 button:
- It changes to "auto save mode" that automatically saves the image when the image changes, and the button display changes to
 .
.
Click to cancel "auto save mode" and the button will return to . - [X] button:
- close the capture screen.
-
Click the [Close] button to close the RemoteScreen utility.
Last updated: 2024/05/09