Focus and moving focus
“Focus” in the System menu indicates the target (focus target) on the screen that can be operated, and is highlighted.
The [Q2] key corresponds to the "next item" and moves the focus to the next focus target in the lower right direction. If the current focus is on the last focus target on the screen, move focus to the first focus target on the screen.
The [Q1] key corresponds to the "previous item" and moves the focus to the next focus target in the upper left direction. If the current focus is on the first focus target on the screen, move focus to the last focus target on the screen.
Example:
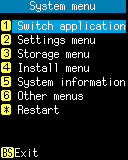
Currently , the focus is on "Switch application".
Press [Q2] key to move the focus to "Settings menu".
Press [Q1] key to move the focus to "Restart".
When the focus target is displayed in gray, it means that the focus target is currently not selectable, and the focus does not move there.
If you press [Q1] key or [Q2] key when the focus is not displayed on the screen, the focus is displayed on the first focus target on the screen.
Example:
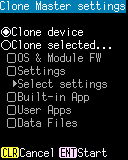
"Clone device" and "Clone selected ..." are focus targets that you can move the focus on. The other items shown in gray are invalid items with the current settings and you cannot move the focus there.
In the example, the focus is not currently displayed, but if you press [Q1] key or [Q2] key , the focus will be displayed in "Clone device".
Focus target type and operation method
This section describes the types of focus targets and how to operate them.
Menu item
-
With the focus target that displays the character string that represents the processing content,
you can start the processing corresponding to that item by focusing and pressing the [SCAN] key.
If the key name is displayed on the left side of the character string, you can also start the process by pressing the key.
Example:
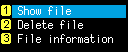
"Show file", "Delete file" and "File information" are menu items. You can also start each process by pressing [1], [2] and [3] key. Check box
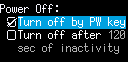
-
You can check or uncheck that item by pressing [SCAN] key while focusing on the item that has ▢ on the left side of the item.
Example:
Radio button
-
In the focus target where ◯ is displayed on the left side of the item,
press [SCAN] key with the focus on to select that item, and other radio buttons that belong to the same group are automatically deselected.
Example:

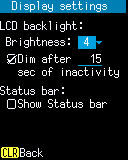
Numeric field
-
An underline is displayed for fields that accept only numbers. The current value is displayed in the field.
When you focus and press the number key, the new value is overwritten. Press [BS]key to clear the value.
Example:
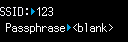
Text field
-
▶︎ is displayed to the left of the field, you can enter characters other than numbers.
The current text is displayed in the field. In a blank text field, <blank> is displayed.
Example:
Focusing on the text field and pressing [SCAN] key opens the Text editing screen where you can edit the text.
Selection list field
-
The field for selecting a setting value from the list. Underline and ▼ is displayed to the right of the field .
The setting value currently selected is displayed in the field.
Example:
Focus on the selection list field and press [SCAN] key to open the Selection list screen and change the setting value.
Text editing screen
You can edit the text in the text field.Example:
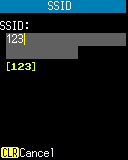
The gray area on the screen is the input field and represents the maximum number of characters that can be entered. When you open the Text edit screen, the current text is displayed in the input field and the blinking cursor is displayed at the end of the text.
The current shift mode is displayed where [123] is displayed on the example.
Operation:
- [0] ~ [9] key, [.] key:
- The character is inserted at the cursor position in the input field. The characters inserted depend on the shift mode.
- [Q1] key, [Q2] key:
- Move the cursor. Use [Q1] key to move left and [Q2] key to move right.
- [BS] key:
- Deletes the character to the left of the cursor.
- [SHIFT] key:
- Switches the shift mode.
- [ENT] key:
- If the text in the input field changes, save your changes and return to the previous screen.
- [CLEAR] key:
- Discard your changes and return to the previous screen.
Type of shift mode and characters that can be entered
You can press the [SHIFT] key to switch to the following type of shift mode. However, the type of shift mode that can be switched differs depending on the screen in which the text edit is opened.- 123 (Numeric mode)
- If you press [0] to [9] keys or [.] key, the characters will be input as they are.
- abc (Lowercase English mode)
- You can enter the following character by repeatedly pressing each key.
 [1] SP _ : ; | & " ' ` ^ ~
 [2] a b c
 [3] d e f
 [4] g h i
 [5] j k l
 [6] m n o
 [7] p q r s
 [8] t u v
 [9] w x y z
 [0] - + ( ) [ ] < > { }
 [.] . , * / @ % \ $ # = ! ?
- ABC (Uppercase English mode)
- You can enter the following character by repeatedly pressing each key.
 [1] SP _ : ; | & " ' ` ^ ~
 [2] A B C
 [3] D E F
 [4] G H I
 [5] J K L
 [6] M N O
 [7] P Q R S
 [8] T U V
 [9] W X Y Z
 [0] - + ( ) [ ] < > { }
 [.] . , * / @ % \ $ # = ! ?
- HEX (HEX mode)
- You can enter the following character by repeatedly pressing each key.
 [1] 1
 [2] A B C 2
 [3] D E F 3
 [4] 4
 [5] 5
 [6] 6
 [7] 7
 [8] 8
 [9] 9
 [0] 0
Selection list screen
You can select one item from the displayed selection list.Example:
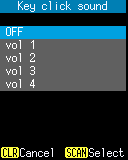
A selection list appears in the gray area of the screen, and the focus is on the currently selected item.
Operation:
- [Q1] key, [Q2] key:
- Move focus. Use [Q1] key to move up and [Q2] key to move down
- [SCAN] key:
- Select the item that currently has the focus and return to the previous screen.
- [CLEAR] key:
- Returns to the previous screen without changing the item selection.
Save settings
In most cases, if any setting is changed, [ENT] Apply is displayed at the bottom of the screen, but the new setting has not been saved yet at this point. You need to press [ENT] key to save the new settings .Example:
 ⇨
⇨
Last updated: 2021/06/17